BGP Configuration with Kathara:
Configuring BGP (Border Gateway Protocol) in Kathara involves multiple steps to set up routers, define autonomous systems (ASes), and establish peering relationships. Here’s a step-by-step guide to configuring BGP in Kathara:
1. **Create the Network Topology:**
Use Kathara’s topology editor to create the network topology you want to work with. Add the necessary routers and links between them.
2. **Configure Routers:**
Double-click on each router in the topology to open the configuration window. Here’s what you need to configure on each router:
– Set the hostname using the `hostname` command, e.g., `hostname RouterA`.
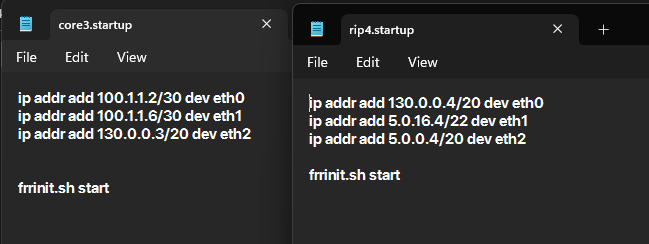
– Assign IP addresses to router interfaces using the `ip address` command, e.g., `ip address 192.168.1.1/24`.
– Enable IP forwarding using the `ip forwarding` command.
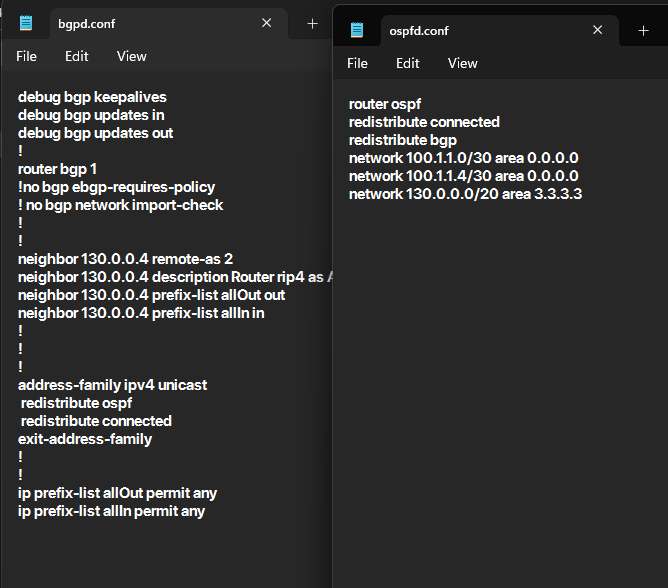
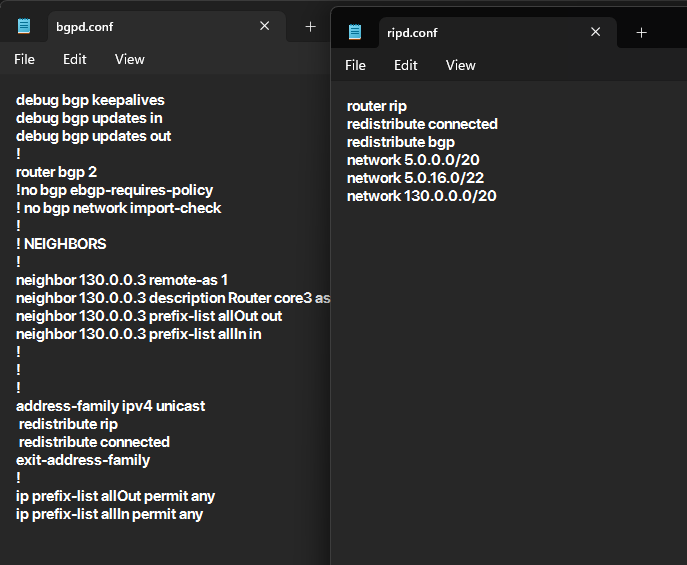
– Enable BGP on the router using the `router bgp` command, e.g., `router bgp 65001`.
3. **Configure BGP AS and Neighbors:**
Inside the `router bgp` configuration context, configure the AS number for the router using the `bgp as-number` command. Then, define BGP neighbors using the `neighbor` command. Specify the neighbor’s IP address and AS number. For example:
“`
router bgp 65001
bgp as-number 65001
neighbor 192.168.1.2 remote-as 65002
“`
4. **Configure Network Advertisements:**
Use the `network` command within the `router bgp` configuration context to advertise network prefixes. Specify the network prefix and mask. For example:
“`
router bgp 65001
network 192.168.1.0/24
“`
5. **Configure Route Maps (Optional):**
You can use route maps to filter or modify BGP routes. Define route maps using the `route-map` command and apply them to inbound or outbound routes using the `neighbor` command. For example:
“`
route-map FILTER-ROUTES permit 10
match ip address prefix-list FILTER-LIST
router bgp 65001
neighbor 192.168.1.2 route-map FILTER-ROUTES in
“`
6. **Start the Simulation:**
Save your configurations and start the Kathara simulation. Routers will start exchanging BGP updates and establishing peering relationships.
7. **Monitor BGP Sessions:**
Use commands like `show ip bgp summary` or `show ip bgp neighbors` on the routers to monitor BGP sessions and peering status.
8. **Verify BGP Routing Table:**
Check the BGP routing table on each router using commands like `show ip bgp` to ensure that advertised routes are present.
Remember that this is a simplified guide, and the actual configuration might vary based on your specific scenario and requirements. Always refer to the documentation of your Kathara version and any networking concepts relevant to BGP for accurate configuration.
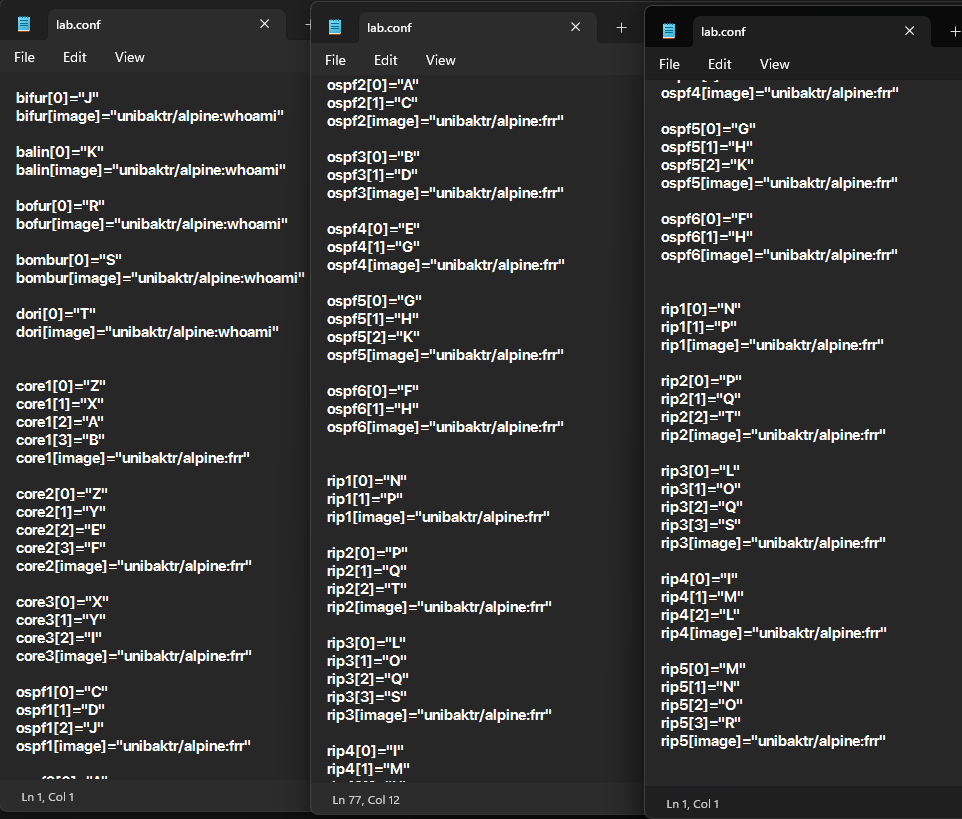
Lab.conf
bifur[0]=”J”
bifur[image]=”unibaktr/alpine:whoami”
balin[0]=”K”
balin[image]=”unibaktr/alpine:whoami”
bofur[0]=”R”
bofur[image]=”unibaktr/alpine:whoami”
bombur[0]=”S”
bombur[image]=”unibaktr/alpine:whoami”
dori[0]=”T”
dori[image]=”unibaktr/alpine:whoami”
core1[0]=”Z”
core1[1]=”X”
core1[2]=”A”
core1[3]=”B”
core1[image]=”unibaktr/alpine:frr”
core2[0]=”Z”
core2[1]=”Y”
core2[2]=”E”
core2[3]=”F”
core2[image]=”unibaktr/alpine:frr”
core3[0]=”X”
core3[1]=”Y”
core3[2]=”I”
core3[image]=”unibaktr/alpine:frr”
ospf1[0]=”C”
ospf1[1]=”D”
ospf1[2]=”J”
ospf1[image]=”unibaktr/alpine:frr”
ospf2[0]=”A”
ospf2[1]=”C”
ospf2[image]=”unibaktr/alpine:frr”
ospf3[0]=”B”
ospf3[1]=”D”
ospf3[image]=”unibaktr/alpine:frr”
ospf4[0]=”E”
ospf4[1]=”G”
ospf4[image]=”unibaktr/alpine:frr”
ospf5[0]=”G”
ospf5[1]=”H”
ospf5[2]=”K”
ospf5[image]=”unibaktr/alpine:frr”
ospf6[0]=”F”
ospf6[1]=”H”
ospf6[image]=”unibaktr/alpine:frr”
rip1[0]=”N”
rip1[1]=”P”
rip1[image]=”unibaktr/alpine:frr”
rip2[0]=”P”
rip2[1]=”Q”
rip2[2]=”T”
rip2[image]=”unibaktr/alpine:frr”
rip3[0]=”L”
rip3[1]=”O”
rip3[2]=”Q”
rip3[3]=”S”
rip3[image]=”unibaktr/alpine:frr”
rip4[0]=”I”
rip4[1]=”M”
rip4[2]=”L”
rip4[image]=”unibaktr/alpine:frr”
rip5[0]=”M”
rip5[1]=”N”
rip5[2]=”O”
rip5[3]=”R”
rip5[image]=”unibaktr/alpine:frr”